Figure 6-1
Save File As
To save a chart, select the File Save... command. If the current chart does not yet have a file name, the Save As dialog box will be displayed. See the Save Chart As procedure below.
If the chart already has a file name, the chart will be saved into the existing file.
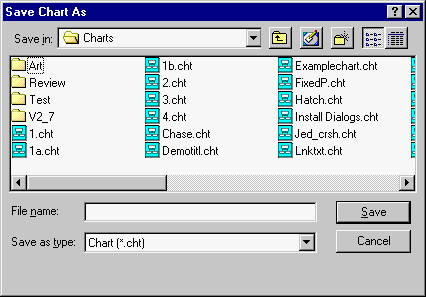
Select the File Save As... command. This option is also selected by the File Save command when the chart does not yet have a file name. The Save File As dialog box is displayed. See Figure 6-1.

Figure 6-1
Save File As
Once in the correct directory, enter the desired file name and click the Save button. If this new name would cause overwriting an existing file, a confirmation is requested. Once a name exists for the chart file, that name is displayed in the main window title bar.
In Chartist Pro, there are two additional formats available, Text and XML. Text File format is the same as in previous versions. To save a file in this format, choose it from the drop down list in the file dialog, create a name for the file, and click on Save. The format for text files is described in detail in Appendix B. Not all information is saved or restored in this format.
XML format carries the extension .nvg-cht-xml, and has two variants.
The Rich Text variant saves and restores all information in the chart, including all text formatting in symbols. That text is saved in RTF using unicode characters (UTF8). While this format provides a human readable and complete definition of the text, it requires external programs to understand RTF.
The Plain Text variant saves all information in the chart, except the symbol text information is rendered in the default font for the document. All other text formatting is discarded. This makes the external parsing of the XML file simpler in the case where that text formatting is not important.
Appendix C documents the Document Type for Chartist XML format files, and the DTD is available on the web site, as well as in the software distribution.
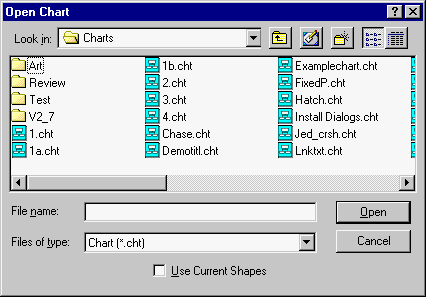
Select the File Open... command. The Open File dialog box is displayed. This dialog is almost identical to the Save As dialog. See Figure 6-2.
Select the desired chart file from the directory list. You may double click the desired file, click on the Open button, or press Enter. Other directories may be browsed by selecting the sub-directories shown. The chart file name may also be typed in if it is known.
Document files contain the name of a shape library. When a document is saved, the name of the current shape library is recorded in the file. When the file is loaded, the referenced shape library is loaded, unless the Use Current Shapes box is checked

Figure 6-2
Opening A Chart File
You can load any chart file as a "template." Loading a chart as a template is similar to opening a chart file, except that the document name is not initialized. This means that Chartist will request a new file name whenever the file is saved or closed. You can use this feature to set up defaults and formats for standard types of charts. Simply create a chart with the desired default attributes, including any standard symbols or lines and save that chart normally. Whenever you want to use that information in setting up a new chart, use the New... command from the File menu.
The Open File dialog will appear as shown in Figure 6-2. Complete the dialog as described above. Templates are stored in the Templates directory, which is a subdirectory of the directory where Chartist is installed. Templates are ordinary chart files that are stored in this directory. You can create your own templates by creating documents and saving them to this area.
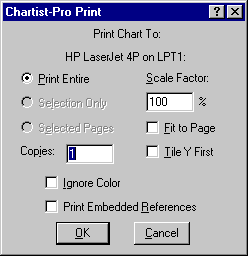
Select the File Print... command. The Print Dialog will appear, See Figure 6-3.

Figure 6-3
Chartist Print Dialog
After a print operation is started it may be canceled before completion via the dialog box that remains in view while Chartist is sending output to the printer. The current printer is used.
When there are selected symbols, the Selection Only box may be checked. The selected group is printed starting at the top left corner of the printer paper. Only those lines connected entirely within the selected group are printed.
When there are selected symbols, the Selected Pages box may be checked. All complete pages containing the selected symbols will be printed.
When the Print Selection box is not checked, the entire chart is printed. The chart is tiled onto the required number of printer pages.
The Tile Y First checkbox causes the chart to be tiled onto paper in Y-order first. This is useful for printing large charts in portrait orientation on continuous form paper.
By choosing a Scale Factor other than 100%, the overall size of the printed chart may be enlarged or reduced. This is useful for getting an overview of a large chart on one or a few sheets of paper. Non scaleable device fonts may not reduce or enlarge properly with this option. By choosing the Fit To Page checkbox, the entire chart will be printed to fit on one page.
In Chartist-Pro symbol references can be OLE objects. By checking the Print Embedded References box, embedded references that are Chartist objects can be printed after the main document is printed.Chartist-Pro
To have a document printed without using any colors other than black and white, check the Ignore Color box.
Choose the File Setup Paper & Printer... command to change the current printer and its settings. The Choose Printer dialog will be displayed. Select a printer from the list of installed printers and click on the OK button.
If different printer settings from the defaults are desired, click on the Setup... button. The printer driver dialog box will be displayed.
To save a selection or an entire document as a graphics image, choose the File Save Graphics File... command. You can save files in any of three formats: Portable Network Graphics (PNG), Enhanced Metafile (EMF), or Placeable Metafile (WMF). If one or more symbols is selected, a Save Selection checkbox is available in the dialog. If you check this box, on the material that is selected will be saved. Otherwise the entire document is saved as a graphics image. Chartist-Pro
A selection or an entire document may be saved as a Web Page in one of three formats:
To save a web page. Choose the File Save Web Page... command. A dialog will appear, allowing you to choose from one of the above formats. Choose a format, and then proceed to the Save dialog to name and save the file.